A prosthetic socket is the most important part of any prosthetic limb. It is the interface between the body and the device, responsible for comfort, stability, safety, and long-term success. No matter how advanced the components are below the socket, a poor-fitting socket will limit function and cause discomfort.
Every socket is custom made. It is not pulled off a shelf or mass produced. The process combines clinical expertise, precision measurement, hands-on craftsmanship, and ongoing refinement to ensure the best possible fit.
Here is a step-by-step look at how a custom prosthetic socket is created.
Step One: Evaluation and Goal Setting
The process begins with a comprehensive evaluation by a prosthetist. This includes reviewing medical history, limb condition, skin integrity, strength, range of motion, and overall mobility. The prosthetist evaluates how the residual limb tolerates pressure and identifies sensitive areas that require relief.
Equally important is understanding the patient’s lifestyle and goals. Work demands, activity level, hobbies, balance needs, and long-term expectations all influence socket design. A person who works on their feet all day will have different needs than someone who primarily walks short household distances.
This information guides every design decision moving forward.
Step Two: Measuring and Capturing Limb Shape
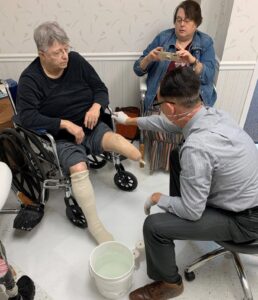 Accurate shape capture is critical. The prosthetist creates a detailed model of the residual limb using either hands-on casting or digital scanning technology. This captures contours, bony landmarks, soft tissue areas, and pressure tolerance zones.
The goal is to create a shape that distributes weight safely while stabilizing the limb inside the socket. Even small inaccuracies can impact comfort and alignment, which is why precision matters at this stage.
The limb model becomes the foundation for building the socket.
Step Three: Modifying the Model for Proper Fit
Once the limb shape is captured, the prosthetist modifies the model to create the correct pressure and relief areas. Certain regions are designed to bear weight, while sensitive areas are relieved to protect skin and underlying structures.
This step requires experience and clinical judgment. It is where anatomy, biomechanics, and craftsmanship come together. The modifications determine how securely the socket holds the limb, how pressure is distributed, and how comfortable the socket feels during movement.
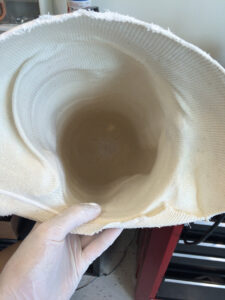
Step Four: Fabricating a Test Socket
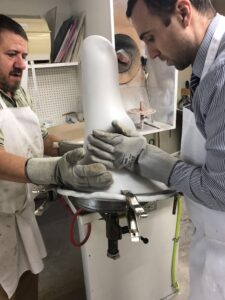 A transparent or semi-transparent test socket is fabricated next. This allows the prosthetist to visually assess fit, pressure distribution, and limb position inside the socket.
The patient tries on the test socket and begins standing and walking under controlled conditions. The prosthetist checks alignment, comfort, suspension, and overall function. Adjustments are made directly to the test socket as needed.
Multiple fittings may occur during this phase to refine comfort and stability.
Step Five: Dynamic Fitting and Adjustments
 The test socket is evaluated during real movement, not just standing still. Walking patterns, balance, stride length, and weight transfer are closely observed. The prosthetist makes fine adjustments to optimize alignment and function.
Feedback from the patient is essential. How the socket feels during movement matters just as much as what it looks like clinically.
The goal is to achieve a secure, comfortable fit that allows natural movement without excessive pressure or instability.
This phase continues until both the patient and prosthetist are confident in the fit.
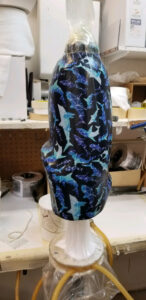
Step Six: Fabricating the Final Socket
Once the test socket fit is approved, the final socket is fabricated using durable materials designed for long-term use. The final socket mirrors the shape and fit of the test socket but offers increased strength, comfort, and cosmetic finish.
Components are assembled, alignment is finalized, and the completed prosthesis is prepared for delivery.
Step Seven: Delivery, Education, and Follow-Up
 At delivery, the patient receives instruction on how to properly don and doff the prosthesis, manage socks or liners, inspect skin, and care for the device. Walking and functional training continue as needed.
Follow-up visits are scheduled to monitor comfort, limb changes, and overall function. Adjustments are normal and expected as the body adapts.
A prosthetic socket is not a one-time fit. It evolves with the patient over time.
Why Custom Matters
Every residual limb is unique. Bone structure, tissue composition, activity level, and medical history all influence socket design. A truly custom socket maximizes comfort, reduces skin risk, improves stability, and supports long-term mobility.
A well-made socket allows the prosthesis to feel like an extension of the body rather than a foreign object.
Final Thoughts on Making a Custom Prosthetic Socket
The process of making a custom prosthetic socket is both science and craftsmanship. It requires attention to detail, patient collaboration, and ongoing refinement. When done correctly, the result is a comfortable, stable foundation that allows individuals to move confidently and live actively.
If you are considering a prosthesis or experiencing discomfort with your current socket, working closely with a qualified prosthetic team can make all the difference.